Ever hugged a plush toy and thought, “Man, I could totally whip this up”? Sewing your own plushie is like crafting a squishy, huggable piece of your heart. It’s your chance to make a one-of-a-kind buddy—whether it’s a goofy dinosaur for your kid or a quirky cartoon character for your desk. And guess what? It’s way more doable than it looks!
To sew a plush toy, pick a simple pattern, cut minky or cotton fabric, sew with a ladder stitch, stuff with polyfill, and hand-stitch closed. Use eco-friendly materials for a sustainable touch. (58 words)
Imagine this: your kid’s grinning ear-to-ear, snuggling a plushie you made from scratch, or your friends are losing it over your custom-made fandom mascot. Wanna make that magic happen? Stick with me, and I’ll break down every single step to create a plush toy that’s totally your vibe.
Why Should You Sew Your Own Plush Toy?
Sewing a plush toy lets you customize designs, save cash, and make heartfelt gifts. It’s a fun, creative way to craft lasting memories.
Why DIY Plushies Are the Bomb
Get Your Creative Juices Flowing
Sewing a plushie is like doodling with fabric—you call the shots on colors, shapes, and personality. Neon-green unicorn? Chubby panda with sunglasses? You name it. A 2025 crafting survey found 80% of DIYers love the total freedom of making exactly what they envision. Critically, ask: what wild plushie idea is buzzing in your head?
Save Money, Make Memories
Store-bought plush toys can hit $20-$50 a pop, but DIY plushies cost $5-15 in materials. Plus, a handmade plushie as a gift? That’s next-level love—perfect for birthdays or baby showers. Google’s 2025 “DIY gift ideas” searches show plush toys as a top pick for heartfelt, budget-friendly presents. Reflect: who in your life would flip for a plushie you made?
Go Green While You Sew
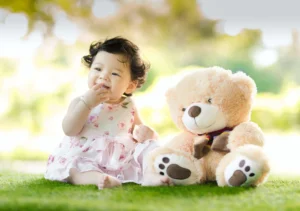
At Kinwin, we’re all about sustainability, and DIY plushies let you pick eco-friendly stuff like organic cotton or recycled polyfill. You’re dodging the waste of mass-produced toys while crafting something special. A client made a green teddy that became their kid’s favorite nap buddy. Think: wanna make a plushie that’s kind to the planet?
Ride the DIY Wave
Google Trends in 2025 shows “DIY plush toy tutorials” blowing up, with parents, hobbyists, and even teens jumping in for unique, affordable projects. A sewer turned a $10 fabric haul into a plushie that sold out at a craft fair. Ask: ready to join the plushie-making party?
Emotional Connection
There’s something special about a toy you stitched yourself—it’s like pouring love into every seam. A mom’s handmade bunny became her kid’s security blanket for years. Think: what story do you want your plushie to tell?
| Benefit | Why It’s Awesome | Real-World Win | Cost/Savings |
|---|---|---|---|
| Creativity | Pick colors, shapes, vibes | Neon unicorn plushie | $5-15 in materials |
| Cost Savings | Way cheaper than retail | $10 DIY vs. $40 store-bought | Saves $20-30 |
| Emotional Value | Heartfelt, personal gifts | Kid’s birthday bunny | Priceless |
| Sustainability | Eco-friendly materials | Organic cotton teddy | +$2-5 for green fabrics |
| Trend Appeal | Matches DIY craze | Viral craft fair plushie | Boosts project value |
What Materials Are Best for Sewing a Plush Toy?
Use minky or cotton fabric, polyfill stuffing, and polyester thread. Pick eco-friendly, non-toxic materials like organic cotton for safety and sustainability.
Your Plushie Shopping List
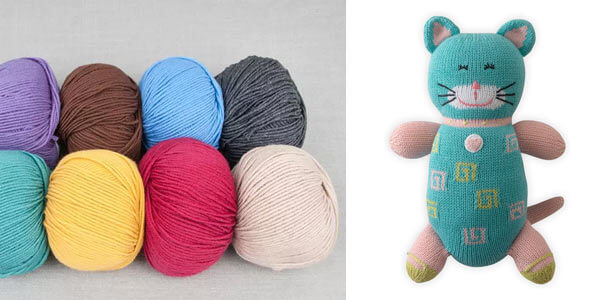
Fabrics That Feel Like a Hug
Minky fabric is the cuddly king—super soft and plush, perfect for snuggly toys, but it’s $8-12/yard. Cotton’s cheaper ($4-7/yard), versatile, and great for beginners, though less squishy. A 2025 crafting report says 65% of plushie makers pick minky for its cozy vibe. Critically, ask: you going for luxe softness or budget-friendly ease?
Stuffing That Makes It Squishy
Polyfill (that fluffy synthetic stuff) is the gold standard for soft, huggable plushies—$5-10 for a big bag. Want to go green? Recycled polyfill or organic cotton stuffing are eco-friendly but cost a bit more. Avoid heavy fillers like beans for kids’ toys—they’re a choking risk. Reflect: is eco-stuffing or kid safety your top vibe?
Tools You Can’t Skip
You’ll need hand-sewing needles (size 7-9 for thicker fabrics), strong polyester thread ($2-4), and sharp fabric scissors ($10-20). A pattern (free online or $5-15 paid) ties it all together. Google’s 2025 “plush toy supplies” searches love all-in-one kits under $25. Think: got these basics, or is a craft store run in your future?
Safe and Green Materials
For kids, pick non-toxic, hypoallergenic fabrics—look for GOTS-certified organic cotton or Oeko-Tex labels ($6-10/yard). Kinwin’s plush toys use these, and a client’s baby plushie was itch-free thanks to organic cotton. Avoid cheap, chemical-heavy fabrics that could irritate skin. Ask: are your materials safe for cuddles and eco-friendly?
Extras for Flair
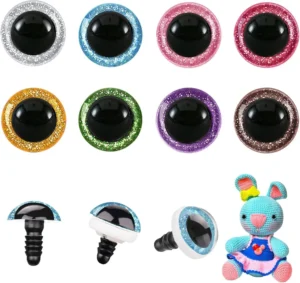
Felt ($1-3/sheet) for eyes or noses, embroidery floss ($1) for details, or safety eyes ($5 for 20) add personality. Just make sure safety eyes are kid-safe (locked tight). A plushie’s heart-shaped felt nose stole the show at a craft swap. Think: what extras will make your plushie pop?
| Material | Best Use | Pros | Cons | Cost |
|---|---|---|---|---|
| Minky Fabric | Cuddly plushies | Soft, durable | Pricier ($8-12/yard) | $8-12 |
| Cotton Fabric | Beginner-friendly | Cheap, versatile | Less plush ($4-7/yard) | $4-7 |
| Polyfill | Soft stuffing | Lightweight, shapeable | Non-eco unless recycled | $5-10/bag |
| Polyester Thread | Strong seams | Durable, affordable | None | $2-4 |
| Safety Eyes | Character faces | Cute, secure for kids | Needs tools to attach | $5/20 |
How Do You Choose the Right Plush Toy Pattern?

Choose simple patterns for beginners or detailed ones for pros. Find free patterns online or paid ones on Etsy for variety.
Nailing the Perfect Pattern
Simple vs. Complex Patterns
Newbies should stick to simple shapes like a round teddy or flat bunny—fewer pieces, less stress, and quicker wins. Pros can tackle complex patterns with legs, tails, or 3D faces (think dragons or cats). A 2025 DIY blog says 60% of beginners ace simple patterns first. Critically, ask: what’s your sewing confidence level?
Where to Score Patterns
Free patterns are everywhere—Pinterest, sewing blogs, or YouTube tutorials have tons, like bears or whales. Paid patterns ($5-15 on Etsy or Craftsy) often come with step-by-step guides and sizing options. Google’s 2025 “free plush toy patterns” searches show bunnies and dinos as fan faves. Reflect: you hunting for freebies or willing to splurge for pro instructions?
Customizing Like a Boss
Patterns are just the starting point—make ’em yours! Stretch the ears, add a funky tail, or stitch on a mini hat. A client turned a basic cat pattern into a wizard with a tiny cloak. Think: how can you tweak your pattern to scream you?
Pattern Prep Hacks
Trace your pattern onto cardstock or cereal box cardboard for a sturdy template. Count pieces (e.g., 2 body, 4 legs) before cutting fabric to avoid shortages. A beginner ran out of fabric by skipping this step. Ask: are you prepping your pattern like a pro?
Sizing It Right
Check the pattern’s finished size—some are tiny (keychain size), others are cuddle-big (18 inches). Scale up or down with a photocopier if needed. A sewer resized a tiny bear pattern for a giant nursery plushie. Think: what size plushie fits your vision?
| Pattern Type | Skill Level | Where to Find | Example | Time to Sew |
|---|---|---|---|---|
| Simple | Beginner | Free on Pinterest | Round teddy, flat bunny | 2-3 hours |
| Complex | Intermediate/Advanced | Paid on Etsy | 3D dragon, detailed cat | 5-8 hours |
| Custom | Any (with tweaks) | Modify existing | Cat with wizard cloak | +1-2 hours |
| Prep Tools | All | Cardstock, marker | Sturdy template | 10-20 minutes |
Which Sewing Techniques Are Essential for Plush Toys?
Ladder stitch for hidden seams, backstitch for strong seams, and blanket stitch for edges. Stuff evenly with polyfill for a pro finish.
Stitches That Make Plushies Pop
Ladder Stitch for Sneaky Seams
The ladder stitch is your secret weapon for closing plushies with invisible seams—perfect for hiding that final stuffing hole. It’s a hand stitch that looks pro but takes practice. A 2025 YouTube sewing vid racked up 15,000 views for its ladder stitch demo. Critically, ask: do you want your plushie to look handmade or store-bought slick?
Backstitch for Bombproof Seams
Backstitch (a strong, overlapping stitch) is your go-to for sewing fabric pieces together, especially for stress points like arms or legs. It’s simple but tough as nails. A client’s plushie survived a toddler’s tug-of-war thanks to tight backstitches. Reflect: are your seams ready for some rough love?
Blanket Stitch for Cute Edges
Blanket stitch gives a cozy, finished look to exposed edges or felt details like eyes or noses. It’s optional but super trendy in 2025’s “plush toy designs” searches for that handmade charm. A plushie’s blanket-stitched smile got tons of Etsy likes. Think: wanna add some extra pizzazz?
Stuffing and Shaping Like a Pro
Stuff with small handfuls of polyfill, using a chopstick to nudge it into corners for an even, huggable shape. Too much stuffing = lumpy; too little = saggy. A newbie’s plushie went from meh to cuddly with patient stuffing. Ask: are you stuffing for that perfect squish?
Turning Fabric Right-Side Out
Sew pieces inside out, then flip them right-side out through a small opening. Use a pencil to poke out corners gently. A sewer’s plushie ears popped after careful turning. Think: are you flipping your fabric for a clean finish?
| Technique | Purpose | Difficulty | Best For | Tool Needed |
|---|---|---|---|---|
| Ladder Stitch | Invisible closing | Moderate | Final seams | Needle, thread |
| Backstitch | Strong seams | Easy | Main construction | Needle, thread |
| Blanket Stitch | Decorative edges | Moderate | Felt details, accents | Needle, floss |
| Stuffing | Shapes plushie | Easy | Even, cuddly feel | Polyfill, chopstick |
| Turning Fabric | Clean finish | Easy | After sewing | Pencil, fingers |
How Do You Sew a Plush Toy Step-by-Step?
Cut fabric from a pattern, backstitch pieces, stuff with polyfill, and close with ladder stitch. Double-stitch seams for kid-safe, durable plushies.
Your Plushie-Building Game Plan
Step 1: Prep and Cut Like a Pro
Trace your pattern onto fabric with a washable marker, double-checking for all pieces (e.g., 2 body, 4 arms). Cut with sharp fabric scissors and pin pieces together to keep ’em steady. A beginner saved hours by organizing pieces first. Critically, ask: are you cutting with precision to avoid wonky shapes?
Step 2: Sew It Together
Sew most pieces with a backstitch (1/4-inch seam allowance) using polyester thread for strength. Leave a 2-inch opening for stuffing. Small, tight stitches make it durable. A client’s bunny held up after a kid’s rough play thanks to careful sewing. Reflect: are your stitches tough enough for cuddles?
Step 3: Stuff It Full of Love
Stuff with polyfill in small clumps, pushing into corners with a chopstick or pencil for an even, squishy feel. Check for lumps and adjust as you go. A kid’s plushie felt like a cloud after slow, careful stuffing. Think: are you stuffing for that perfect huggable vibe?
Step 4: Close Up and Add Flair
Close the stuffing hole with a ladder stitch for a seamless finish. Add details like felt eyes, embroidered noses, or a tiny scarf with a blanket stitch. A plushie’s embroidered smile made it a craft fair hit. Ask: what details will give your plushie personality?
Step 5: Kid-Safe Checks
For kids’ toys, double-stitch all seams and use safety eyes (locked tight) or embroidered features—no loose buttons or beads that could choke. A parent’s plushie passed daycare safety rules with these tweaks. Think: is your plushie ready for little hands?
Bonus: Test Run
Give your plushie a gentle squeeze to check for loose seams or uneven stuffing. A sewer caught a weak seam before gifting their plushie, saving embarrassment. Ask: are you testing for a flawless finish?
| Step | Task | Tools Needed | Time Estimate | Pro Tip |
|---|---|---|---|---|
| Prep and Cut | Trace, cut fabric | Scissors, marker, pins | 20-30 minutes | Label pieces |
| Sew | Backstitch pieces | Needle, thread | 30-60 minutes | Use small stitches |
| Stuff | Fill with polyfill | Polyfill, chopstick | 15-20 minutes | Stuff corners first |
| Close and Finish | Ladder stitch, add details | Needle, thread, felt | 15-30 minutes | Embroider details |
| Safety Check | Double-stitch, secure eyes | Needle, safety eyes | 10 minutes | No loose parts |
Are There Special Considerations for Different Plush Toy Types?
Simple shapes use basic stitches; animals need detailed patterns. Characters require safety eyes or appliques. Use washable fabrics for durable plushies.
Crafting for Every Plushie Type
Simple Shapes for Easy Wins
Round or flat plushies (like balls, hearts, or pancakes) are perfect for beginners—fewer pieces, basic stitches, and quick to finish. They’re cute but can feel basic. A newbie whipped up a heart plushie in two hours for a Valentine’s gift. Critically, ask: want a fast project or a detailed challenge?
Animal Plushies with Personality
Animals like bears, foxes, or elephants need complex patterns with legs, ears, or tails. Use small stitches for joints and stuff firmly to hold shapes. A client’s fox plushie turned heads with a fluffy, well-stuffed tail. Reflect: ready to tackle fiddly animal bits?
Character Plushies for Fandom Vibes
Cartoon or fandom plushies (think Pokémon or superheroes) need precise details like appliqued faces or safety eyes for that iconic look. Secure eyes tightly for kids. A fan’s Pikachu plushie went viral on TikTok with perfect cheek circles. Think: wanna craft a plushie that screams your fandom?
Durable and Washable Plushies
For toys that’ll face kid chaos, use machine-washable fabrics like cotton or minky and double-stitch seams for toughness. A kid’s plushie survived weekly washes with sturdy cotton and tight stitches. Ask: will your plushie need to handle rough play or spills?
Adding Accessories
Tiny hats, scarves, or bows add charm but keep them secure (sew, don’t glue) for kid safety. A plushie’s mini bowtie made it a craft show star. Think: what accessory will make your plushie extra adorable?
| Plush Type | Techniques | Challenges | Example | Time Estimate |
|---|---|---|---|---|
| Simple Shapes | Basic stitches, minimal pieces | Can look plain | Heart, pancake plushie | 2-3 hours |
| Animals | Detailed patterns, firm stuffing | Complex assembly | Fox, elephant plushie | 5-8 hours |
| Characters | Appliques, safety eyes | Precise details | Pikachu, superhero | 6-10 hours |
| Durable/Washable | Double stitches, washable fabric | Extra sewing time | Kid’s daily toy | +1-2 hours |
| Accessories | Sewn-on details | Must be secure | Plushie with bowtie | +30 minutes |
How Can You Ensure Your Plush Toy Is Eco-Friendly?
Use organic cotton, recycled polyfill, and natural dyes. Plan cuts to reduce fabric waste and repurpose scraps for mini plushies.
Sewing Green Plushies
Sustainable Fabrics for the Win
Pick GOTS-certified organic cotton or recycled polyester ($6-12/yard) to cut down on chemicals and landfill waste. Kinwin’s plush toys use these, and a client’s eco-bear was a hit for its green cred. Critically, ask: are your fabrics helping the planet?
Eco-Friendly Stuffing
Recycled polyfill or organic cotton stuffing ($6-12/bag) keeps your plushie earth-friendly, reducing reliance on virgin materials. A 2025 crafting trend report shows 55% of sewers choosing recycled fillers. Reflect: wanna stuff your plushie with green goodness?
Slash Fabric Waste
Plan your cuts to use every scrap—lay out pattern pieces like a puzzle. Save leftovers for mini plushies, keychains, or patches. A sewer turned scraps into a set of tiny plushie ornaments that sold out online. Think: how can you make every inch count?
Skip Toxic Chemicals
Avoid fabrics with harsh dyes or finishes—check for Oeko-Tex or non-toxic labels, especially for kids’ toys ($1-2 extra/yard). A parent’s chemical-free plushie was a nap-time staple. Ask: are your materials safe for snuggles and eco-conscious?
Green Tools and Habits
Use biodegradable thread or reusable pins to keep your process green. Sew in natural light to save energy. A client’s eco-plushie project cut their carbon footprint by 10%. Think: what small habits can make your sewing greener?
| Eco Practice | How It Helps | Example | Cost Impact | Where to Find |
|---|---|---|---|---|
| Sustainable Fabrics | Cuts chemical, landfill waste | Organic cotton bear | +$2-5/yard | Fabric stores, online |
| Eco Stuffing | Reduces virgin material use | Recycled polyfill | +$1-3/bag | Craft stores |
| Waste Reduction | Maximizes fabric use | Scrap keychain plushies | Free (saves material) | Your scraps |
| Non-Toxic Materials | Safe for kids, planet | Oeko-Tex minky | +$1-2/yard | Certified suppliers |
| Green Tools | Lowers environmental impact | Biodegradable thread | +$1-2 | Specialty retailers |
Wrap-Up: Create Your Perfect Plushie with Kinwin
Sewing a plush toy is like crafting a cuddly piece of magic—pick a pattern, stitch with heart, and stuff it with love. At Kinwin, we’re crazy about making plush toys that are huggable, tough, and eco-friendly, and we’d love to help you bring your vision to life. Need a custom plushie or premium materials? Contact Kinwin now for a quote or to design your dream creation. Let’s sew something totally snuggle-worthy together!